Native Staking Portal Guide
Our Native Staking Portal will be up SOON! Learn everything about the new staking process in this guide.
As we move over to a new home, we’re also finally moving staking at the Crypto Unicorns website, so everything is all in one place! Head over to our portal now and stake $CULP and $CU: https://www.cryptounicorns.fun/staking
Note: Staking now takes place on the Arbitrum One network! Make sure that you’ve bridged $RBW to $CU before you start staking!
In this Article
How to Obtain $CULP?
Note: Make sure you have enough $ETH for gas fees!
You obtain $CULP by adding liquidity to the $CU/$ETH liquidity pool on the native staking portal. You will need to purchase $ETH and $CU outside the staking portal (purchase $ETH and $CU at Camelot) then take the tokens to add liquidity on our staking portal.
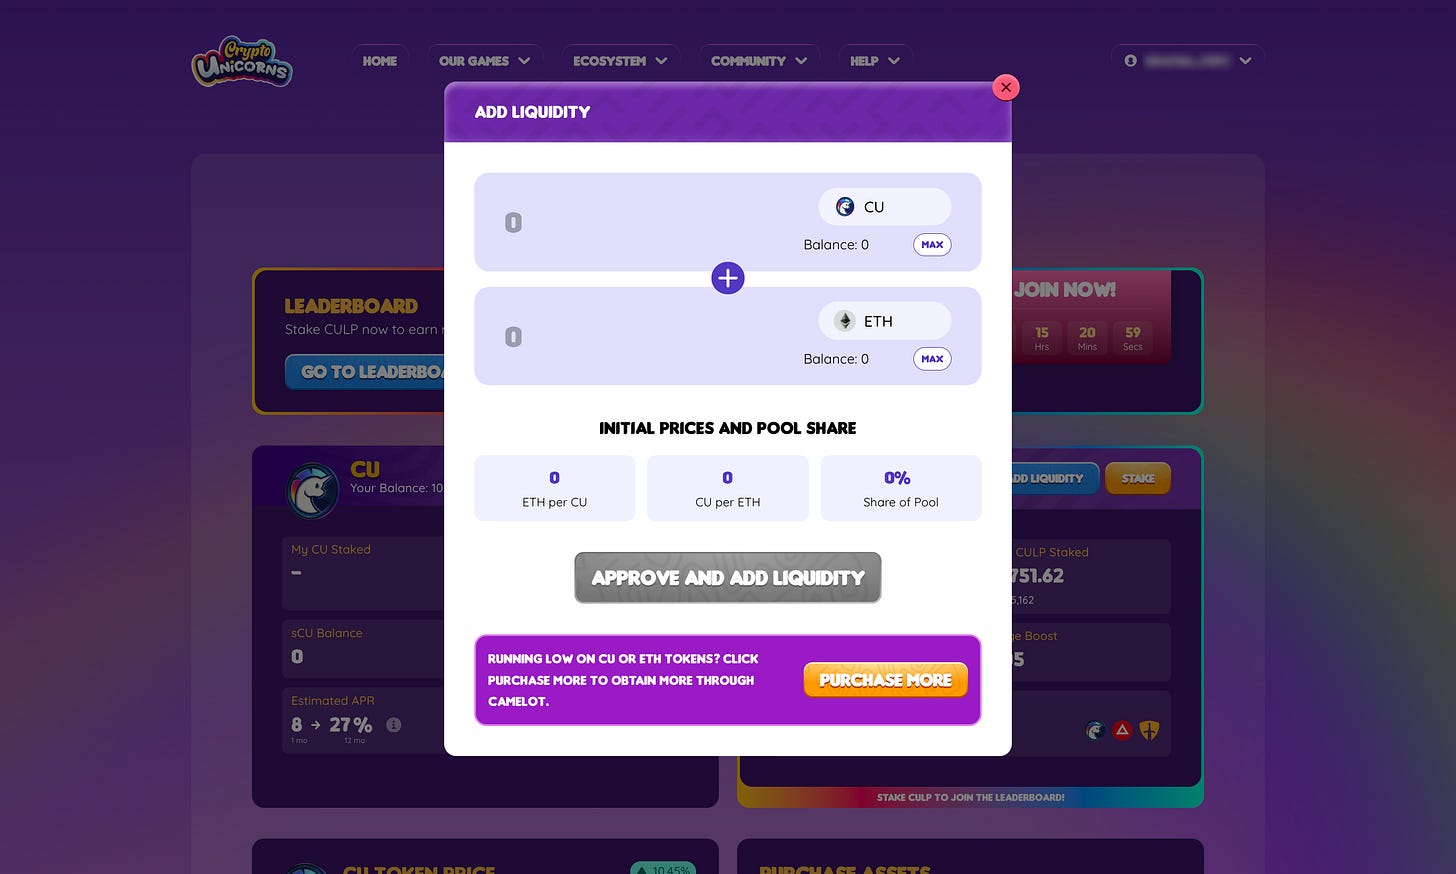
Connect your wallet to our staking portal then head over to the $CULP block. There, you will find the “Add Liquidity” button.
Click it and enter the $CU amount and the equivalent $ETH amount that you would like to acquire. When you add liquidity, you are adding an equal value to each token to mint $CULP tokens. Click “Approve and Add Liquidity” to proceed.
After clicking the “Approve and Add Liquidity” button, a popup will show the estimated amount of $CULP tokens that you will receive. Click “Confirm” once you’re good with the amount of tokens you’ve deposited.
A blockchain transaction will pop up. Confirm the transaction to proceed.
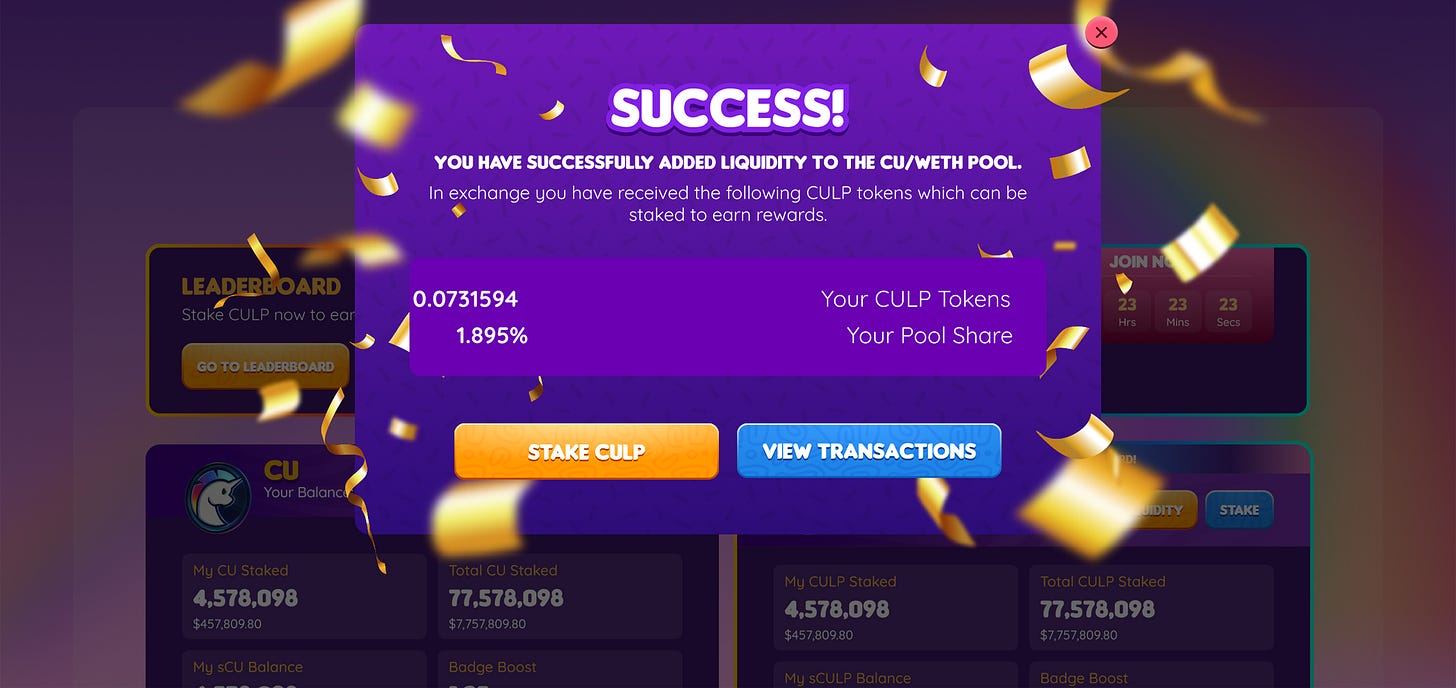
Once the transaction is completed, a prompt saying “Success” should pop up on your screen.
Once you have added liquidity, you will be able to stake your $CULP tokens to generate rewards.
IMPORTANT: ADD LIQUIDITY ON THE CU STAKING PORTAL! If you’re adding liquidity via Camelot DEX, please do not turn your proof of liquidity into an NFT, as this cannot be staked via our contract and will not generate leaderboard points.
How to Stake $CULP?
Notes:
Delegate your badges before staking $CULP! Badge Boosts will only be received on deposits once badges have been delegated. If the badges aren’t delegated before staking, you will miss out on the badge bonus! Read more: How to Delegate a Badge?
Existing deposits will be migrated with the existing badge boosts that you had on Polygon, but you will need to re-delegate your badges before re-enabling your badge boost.
Make sure you have enough $ETH for gas fees!
Upon adding liquidity into the $CU/$ETH pool via the staking portal, you can immediately stake the $CULP you have acquired by clicking the “Stake CULP” button.
If you’re coming from the “Overview” tab you can click “Stake” in the $CULP block, you may also You can check your received $CULP here.
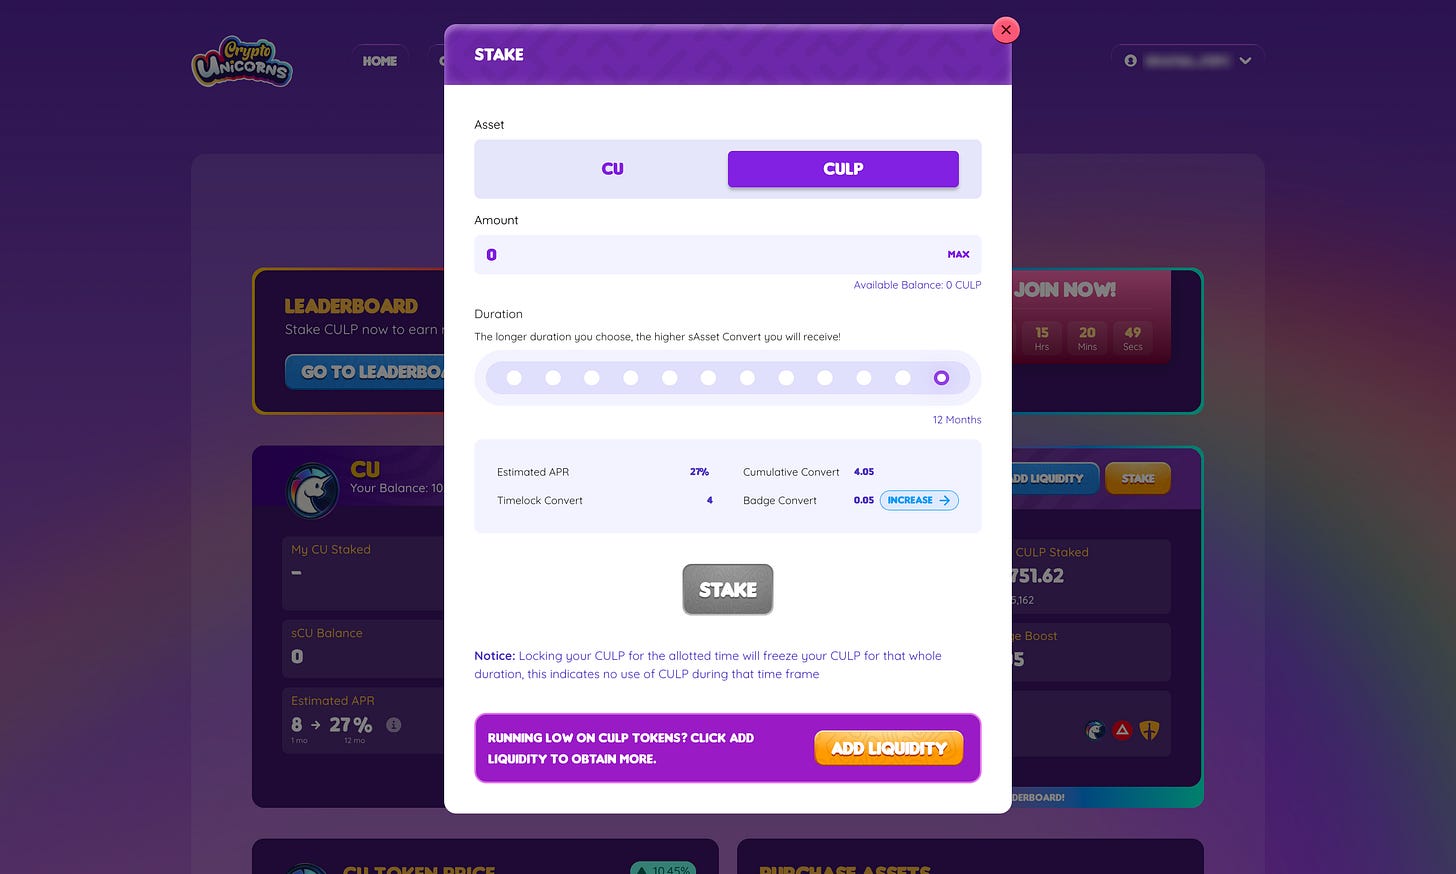
Now in the “Stake” popup enter the $CULP balance you want to stake. Choose your preferred duration for your $CULP to be staked, you have the option to stake from 1 month to 12 months. The longer the duration, the higher sAsset amount you will receive. The Badge Bonus, Estimated APR, Timeblock Convert, and Cumulative Convert will be shown on the popup. Once, you’ve finalized the amount of $CULP and duration to stake, click the “Stake” button.
A blockchain transaction will pop up. “Confirm” to proceed with staking and wait for the transaction to be completed. Once the transaction completes, you’ve now successfully staked $CULP.
Liquidity Bootstrapping Leaderboard
In case you haven’t read our article on the Liquidity Bootstrapping Event, if you stake $CULP, you can participate in the Liquidity Bootstrapping Leaderboard where $CU and $XAI, as well as Mythic Lootboxes and Progression Bundles via Lockdrops, are up for grabs as rewards. The Liquidity Bootstrapping Leaderboard will run from May 7 to June 21, 2024.
Participants who stake their $CULP tokens through our Staking Portal will gain leaderboard points daily depending on their amount of sCULP and if they received a multiplier for staking for 12 months.
Modifiers:
6x: received for staking a $CULP deposit for 12 months before May 27th.
4x: received for staking a $CULP deposit for 12 months before June 21st.
Read more about the Liquidity Bootstrapping Leaderboard:
$CU Liquidity Bootstrapping Event
Hey Unifam! We are excited to announce the $CU Liquidity Bootstrapping Event! This event will go live on May 7th, 2024, 8:00 PM UTC to celebrate the release of the Rainbow Bridge and Staking Website. This event’s goal is to create ample liquidity for the new $CU token and establish its presence on Arbitrum!
How to Stake $CU?
Notes:
Delegate your badges before staking $CU! Badge Boosts will only be received on deposits once badges have been delegated. If the badges aren’t delegated before staking, you will miss out on the badge bonus! Read more: How to Delegate a Badge
Existing deposits will be migrated with the existing badge boosts that you had on Polygon, but you will need to re-delegate your badges before re-enabling your badge boost.
Make sure you have enough $ETH on Arbitrum for gas fees!
$CU is now the primary token of the Crypto Unicorns ecosystem, replacing $RBW after we migrated over to XAI. If you haven’t migrated your $RBW to $CU yet, check out our $RBW to $CU guide to get you started.
Head over to the staking portal and go to the “Overview” tab. On the $CU block, click the “Stake” button.
Next, input the amount of $CU you want to stake in the popup. Then, choose your preferred duration for your $CU to be staked, you have the option to stake from 1 month to 12 months. Like $CULP longer you stake, the higher the sAsset amount you will receive. The Badge Bonus, Estimated APR, Timeblock Convert, and Cumulative Convert will also be shown on the popup.
Once, you’ve finalized the amount of $CU and duration to stake, click the “Stake” button. A blockchain transaction will pop up. “Confirm” to proceed with staking and wait for the transaction to be completed. Once the transaction completes, you’ve now successfully staked $CU.
How to Delegate a Badge?
Note:
Existing deposits will be migrated with the existing badge boosts that you had on Polygon, but you will need to re-delegate your badges before re-enabling your badge boost.
Make sure you have enough $ETH for gas fees!
Badges are ERC-1155 tokens that are rewarded to players by participating in-game events and DAO operations. Badges can be delegated to your account, or another account, to boost the account’s sAsset convert which will increase the amount of rewards the deposit generates pro rata, and the deposit’s voting power for $CU deposits.
Note: Make sure you have enough $ETH for gas fees!
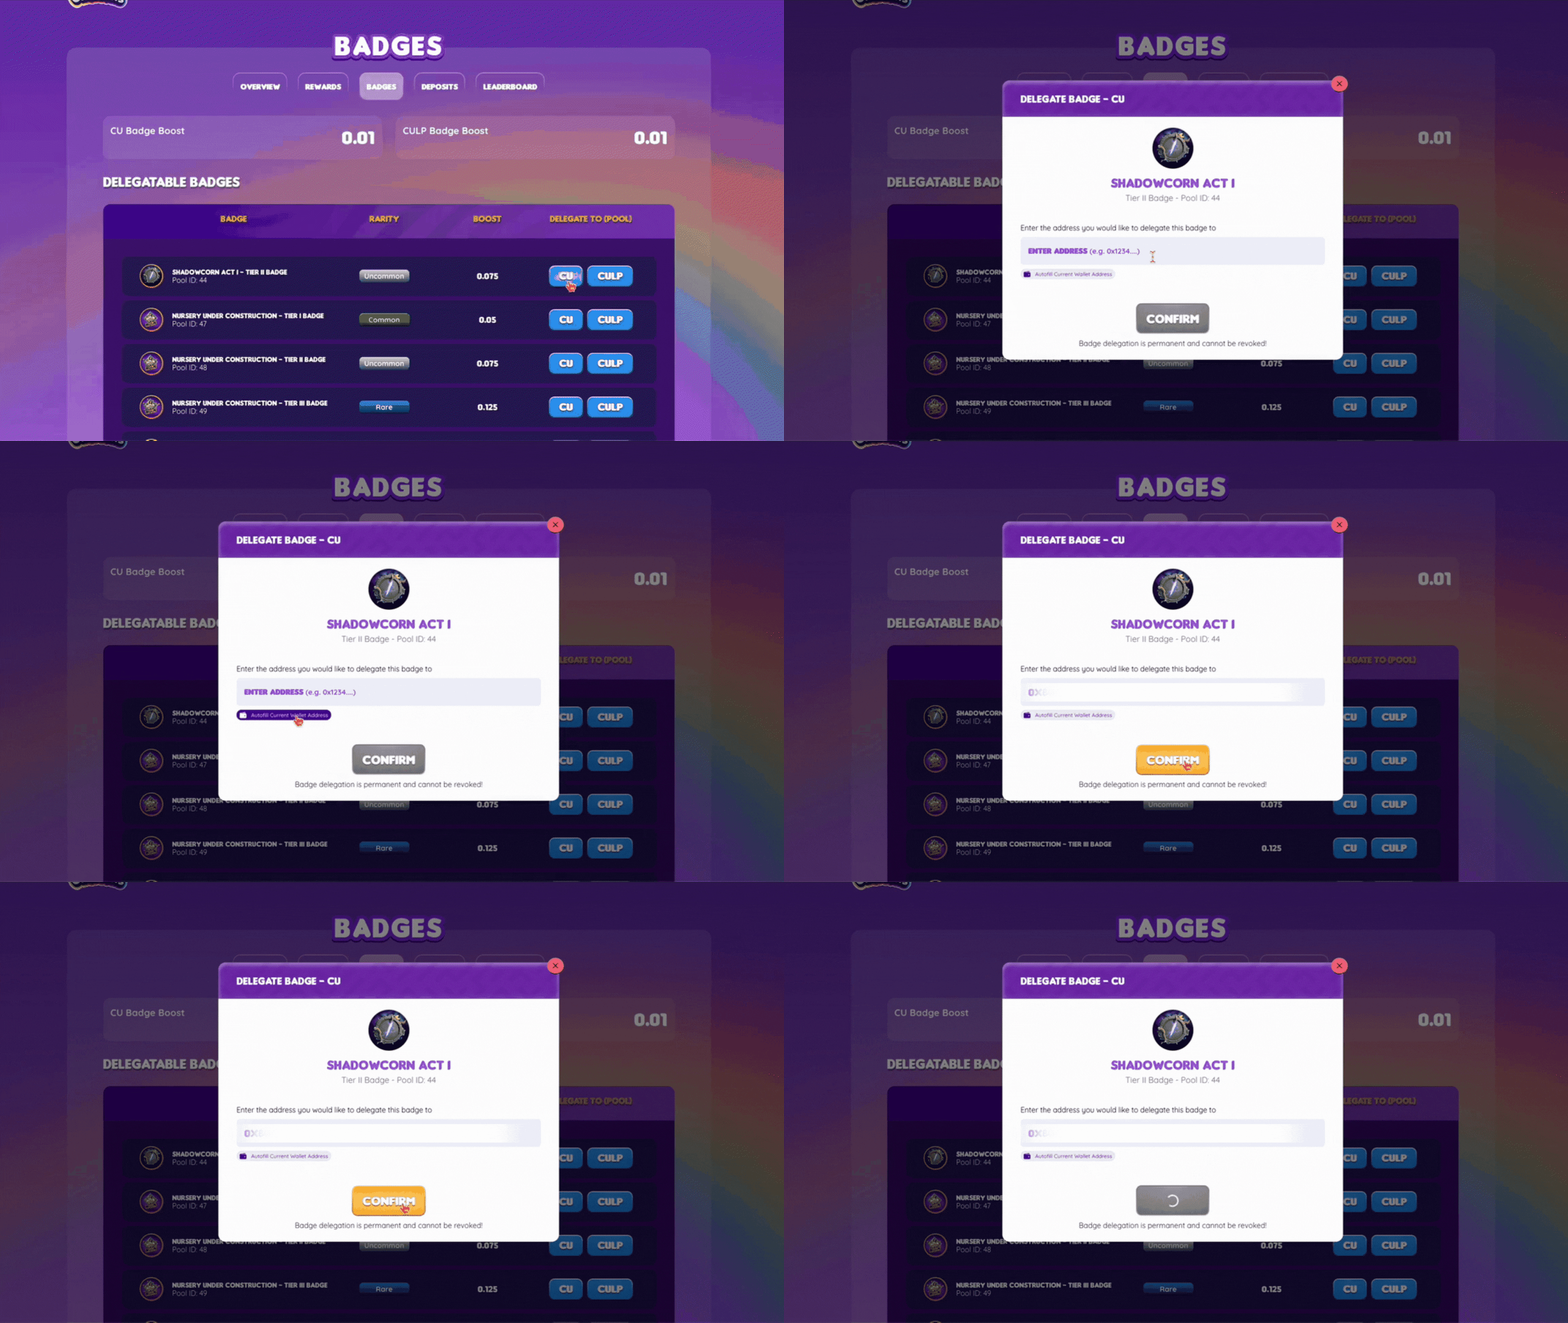
Head over to the staking portal, connect your wallet that has badges, and go to the “Badges” tab. Next, scroll to your list of badges, choose a badge to delegate, and click either the $CU or $CULP button under the “Delegate to” column. Badges are delegated per pool ($CU & $CULP). If you delegated a badge to the $CU pool, you still need to delegate it to $CULP to receive the associated boosts when staking $CULP.
After clicking $CU or $CULP a popup will prompt where you can delegate the badge to your address or enter another wallet address you wish to delegate your badge to.
A blockchain transaction will pop up. Sign the transaction to delegate the badge. Wait for the transaction to be completed. A message will pop up once the delegation of your badge has been completed.
How to Claim Staking Rewards?
Note: Rewards are deposited on a daily basis (04:45 UTC) and claimable through a transaction.
When you have rewards ready to claim, you will be able to initiate a claim. Once the claim has been initiated, it will be moved to the Escrowed Rewards section and undergo a 7-day lockup period. After this period has concluded, you will be able to complete the claim and have the rewards sent to your wallet address.
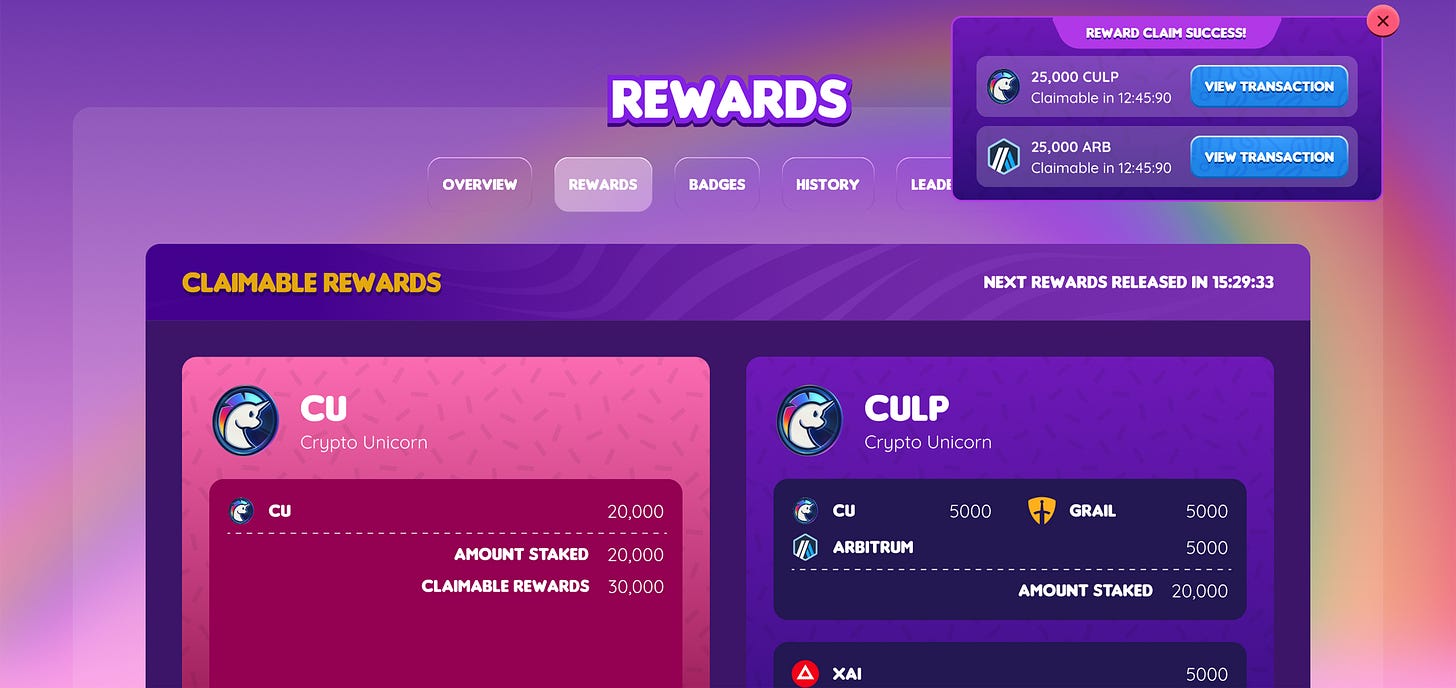
To start claiming your rewards, head over to the staking portal on the “Rewards” tab. Check your available $CU and $CULP rewards for claiming under the claimable rewards section. Click the “Initiate Claim” button under the pool rewards you want to claim.
A blockchain transaction will pop up. Confirm the transaction to proceed with initiating the claim. Wait for the transaction to complete and you should see a “Initiate Claim Success” message popup on the top right side of the page with the countdown time that the escrowed reward will be available for claiming.
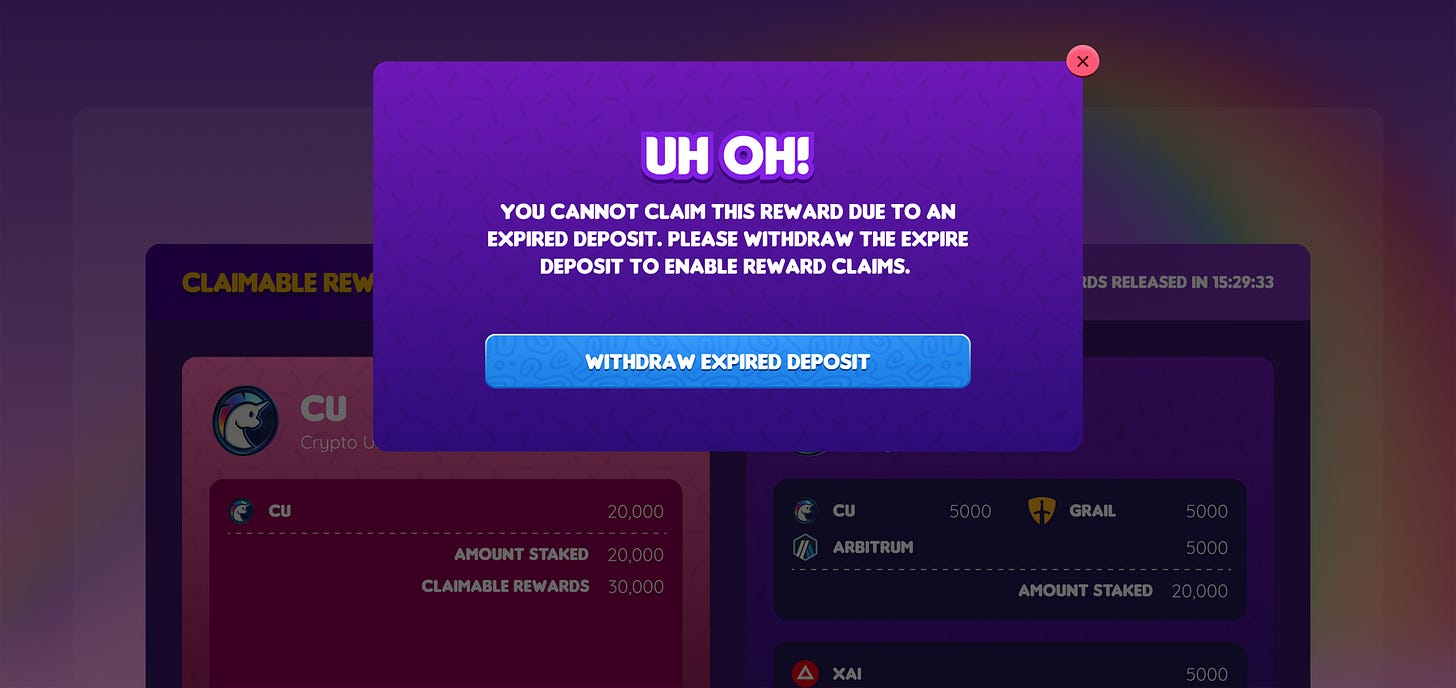
Note: If a player initiates a claim on a pool that has an expired deposit, a message prompt will pop up that will inform stakers to withdraw their expired deposit before they can claim the reward.
Stakers may click the “Withdraw Expired Deposit” button to be redirected to the history tab and withdraw the expired deposit.
Successful initiated claims will be found under the “Escrowed Rewards” in the Rewards tab. Stakers will need to wait for a 7-day lock-up period before fully claiming the escrowed rewards. If the 7-day lock-up period is completed, you may click the “Claim Reward” beside the escrowed reward you want to claim.
A blockchain transaction will pop up. Confirm the transaction to proceed with claiming. Wait for the transaction to complete and you’ve successfully claimed your staking rewards!
How to Unstake?
Note that you have to wait for the duration of staking to end to unstake your $sCU or $sCULP deposits. Then, you can find your expired $sCU and $sCULP deposits on the “History” tab
Click the “Withdraw” button beside the expired deposits you want to unstake. A blockchain transaction will pop up. Confirm the transaction to proceed with withdrawing the reward.
Once the transaction completes, a “Withdrawal Success” message will pop up in the top right of the page with a link to direct you to see the transaction hash.
After successfully withdrawing your expired deposits, you will receive the corresponding deposited $CU and $CULP and can restake it to continue generating rewards.
Frequently Asked Questions
Can I delegate my badge at any time?
If you’re delegating a badge for the first time on the new staking portal, yes! Make sure to delegate badges before staking and note that once a badge is delegated, it will be permanently tied to the delegated account, and will not be able to be used again.
Can I un-delegate my badge if I want to at any time?
No, once a badge has been delegated to an account, permanently tied to the delegated account.
Can I use two of the same badges in the one staking wallet at once and get twice the boost?
No, each staking wallet can only earn the boost once for each badge type. (E.g. A player with two (2) “I Survived Launch!” badges can only receive the bonus for the first “I Survived Launch!” badge delegated for each pool.)
Note that Badges are delegated per pool ($CU & $CULP). If you delegated a badge to the $CU pool, you still need to delegate it to the $CULP to receive the associated boosts when staking $CULP.
What will happen if I forget to withdraw my $sCU or $sCULP deposits and expire?
Expired $sCU or $sCULP deposits can be withdrawn under the “History” tab of the staking page.
Can I claim the rewards along with my expired deposits at the end of the lockup period?
Yes, you can but note that rewards can be claimed daily or at the end of the lockup period under the “Rewards” tab, and the expired deposits can be only withdrawn at the end of the lockup period from the “History” tab of the new staking page.
What happens if I have a claimable reward on the old staking contract?
You will be able to access the old staking portal by clicking the link at the bottom of the overview page and claiming the reward from there. Note that you will need to claim these rewards on the Polygon network.
Are the badges that I delegated on the Staking v2 website automatically delegated on the native staking portal?
No, you will need to redelegate your badges before re-enabling your badge boost. Make sure to re-delegate your badges before staking a deposit. Existing deposits, however, will be migrated with the existing badge boosts that they had on the Staking v2 website.


